On Saturday February 3, 1945 the United States Eighth Air Force, send 1,500 bombers led by Lieutenant Colonel Robert Rosenthal of the 100th Bombardment Group escorted by 1,000 fighters to attack the Berlin railway system as the Russian Army approached from the east. The 34th Bombardment Group from Mendlesham AFB sent 38 aircrafts on the mission led by Lieutenant Colonel Roy E. Tavasti flying in B-17 43-38113 "Wee Willie’s Wolves". 36 aircrafts from the 34th dropped 90 tons of bombs on the primary target and only 2 aircrafts failed to drop their bombs.
Lieutenant Colonel Tavasti later wrote We expected to take a severe beating because of the reported 500 heavy anti-aircraft guns that defended the city. On the bomb run to our particular target the prospects didn't appear too rosy. The bomb group immediately ahead of the 34th completely disappeared in a black cloud of flak smoke with the exception of two or three momentary large orange flashes that indicated catastrophic explosions of bombers ahead of us. Then a strange thing occurred. The 34th, which was leading the 93rd Bomb Wing slipped in and out of the target area with nearly no shots fired at us. I can only speculate that, the flak guns were overheated by the time we came into range. As a consequence, we had a free ride while the guns were cooling. As it turns out, the mission to Berlin unexpectedly ended up being somewhat of a nerve shattering milk run
The photographs below this page are a collection from a full uncut roll of film taken by Lew Funk that wonderfully preserves the 34th Bomb Group's role in the massive raid on Berlin on February 3, 1945.
They show the 34th Bomb Group's role in the massive raid on Berlin on February 3, 1945. The sequence of the pictures in this collection preserve the story of the flight across the English Channel, bombs dropping on the target, the surprisingly light flak the men endured over enemy territory, and their safe return home to Mendlesham Air Force base. The American air attack on Berlin's railway system on February 3rd was one of the heaviest of the entire war. Overall 1,500 bombers from the Eighth Air Force flew this mission and 1,000 fighters joined to protect them. The 34th Bomb Group dispatched 38 planes for this mission and dropped 90 tons on the primary target.
Lew Funk's log from this mission state:
2-3-45 Berlin Germany, Out to squash the town 300lb Bombs at 50 ft. Intervals, 1500 Aircrafts, did a damn good job. Pilot Hammersley, Ship #343, Time 6:35 - Further research shows Lew Funk actually flew with the Hammersley crew on 43-38343 "The Big Gear" two versions of his logs show two different aircraft number, but the official records of the day confirm he was on 43-38343.
This collection of photographs has special historical value because the pictures are from an intact roll of film which accurately preserves the order of events and many of the pictures include aircrafts with visible tail numbers which accurately identify them.
These images were originally shot on color film, but the color degraded over time. This caused most the colors to oxidize and turn orange. Only a little bit of red survived in the images. To best preserve the images most them are rendered in black and white like other images from that period.
Photo 1: B-17s on Mission to Berlin February 3, 1945
Photo 2: Unidentified B-17 on Mission to Berlin February 3, 1945
Photo 3: B-17s on Mission to Berlin February 3, 1945
Photo 3: B-17s on Mission to Berlin February 3, 1945 - Actual Color
Photo 4: B-17s on Mission to Berlin February 3, 1945
Photo 5: Moon setting over the English Channel on Mission to Berlin February 3, 1945 taken from the Radio Room Top Hatch and some more text to force it to wrap
Photo 6: Formation of B-17s silhouetted by the Moon setting over the English Channel on Mission to Berlin February 3, 1945
Photo 7: Formation of B-17s with contrails on Mission to Berlin February 3, 1945
Photo 8: Formation of B-17s with contrails on Mission to Berlin February 3, 1945
Photo 9: Formation of B-17s with contrails on Mission to Berlin February 3, 1945
Photo 10: B-17 43-38785 on Mission to Berlin February 3, 1945 taken from the radio room top hatch
Photo 10: B-17 43-38785 on Mission to Berlin February 3, 1945 taken from the radio room top hatch - Actual Color
Photo 11: B-17 on Mission to Berlin February 3, 1945 taken from the radio room top hatch
Photo 12: Bombs Dropping on Berlin February 3, 1945 taken from the bomb bay catwalk
Photo 13: Flak after the target on mission to Berlin February 3, 1945. Reports said 500 anti-aircraft guns defend Berlin, but the 34th Bomb Group encountered only light flak on this mission.
Photo 14: Flak after the target on mission to Berlin February 3, 1945
Photo 15: Unidentified B-17 on Mission to Berlin February 3, 1945
Photo 15: Unidentified B-17 on Mission to Berlin February 3, 1945 - Actual Color
Photo 16: B-17s on Mission to Berlin February 3, 1945
Photo 17: B-17s on Mission to Berlin February 3, 1945
Photo 18: B-17 44-8327 Goom-Bah on Mission to Berlin piloted by Shifferer. Note that Engineer #2 is feathered. The American Air Museum in Britain has another picture of Goom-Bah
Photo 19: B-17s including 44-8235 Mikkey Returning over water from Berlin February 3, 1945
Photo 19: B-17s including 44-8235 Mikkey Returning over water from Berlin February 3, 1945 - Actual Color
Photo 20: B-17s Returning over water from Berlin February 3, 1945
Photo 21: B-17s Over Mendlesham AFB at the End of a Mission to Berlin February 3, 1945
Photo 22: Windmill Near Mendlesham after Mission to Berlin February 3, 1945
Photo 23: B-17's Near Mendlesham after Mission to Berlin February 3, 1945
Photo 24: B-17's Near Mendlesham after Mission to Berlin February 3, 1945
Photo 25: B-17's Near Mendlesham after Mission to Berlin February 3, 1945 - Color Scan
Photo 26: B-17's Near Mendlesham after Mission to Berlin February 3, 1945 the closes ship is 43-38365 Sugar
Photo 26: B-17's Near Mendlesham after Mission to Berlin February 3, 1945 the closes ship is 43-38365 Sugar - Actual Color
Photo 27: B-17's Near Mendlesham after Mission to Berlin February 3, 1945
Photo 20: B-17's Near Mendlesham after Mission to Berlin February 3, 1945 - Actual Color
Photo 21: B-17s Over Mendlesham AFB at the End of a Mission to Berlin February 3, 1945
Photo 22: B-17s Over Mendlesham AFB at the End of a Mission to Berlin February 3, 1945
Photo 23: Flying over Diss Mere after Mission to Berlin February 3, 1945
Photo 24: Flying over Diss Mere after Mission to Berlin February 3, 1945
Photo 25: Flying over Diss Mere after Mission to Berlin February 3, 1945
Photo 26: Flying over Diss Mere after Mission to Berlin February 3, 1945
Photo 27: Landing at Mendlesham AFB after Mission to Berlin February 3, 1945
Photo 28: Landing at Mendlesham AFB after Mission to Berlin February 3, 1945
Photo 29: B-17 Landing at Mendlesham AFB after Mission to Berlin February 3, 1945
Photo 30: P-51 Mustang 44-14523 L2-K Little Wildfire at Mendlesham AFB after mission to Berlin February 3, 1945
The P-51 coming into land is Little Wildfire which was 44-14523 L2-K before becoming The Yakima Chief. Pilot was John N Muir. 479th FG - 435th FS, the nose artist was S/Sgt Fred Hayner. Muir crash-landed it on 6th March 1945, but it was later put back into service.
Photo 30: P-51 Mustang 44-14523 L2-K Little Wildfire at Mendlesham AFB after mission to Berlin February 3, 1945 - Actual Color
The P-51 coming into land is Little Wildfire which was 44-14523 L2-K before becoming The Yakima Chief. Pilot was John N Muir. 479th FG - 435th FS, the nose artist was S/Sgt Fred Hayner. Muir crash-landed it on 6th March 1945, but it was later put back into service.
Photo 31: B-17 Landing at Mendlesham AFB after Mission to Berlin February 3, 1945
Photo 32: Mendlesham AFB after Mission to Berlin February 3, 1945
Photo 32: American Flag Flying at Mendlesham AFB after Mission to Berlin October 6 1944
Photo 32: American Flag Flying at Mendlesham AFB after Mission to Berlin October 6 1944 - Actual Color
Photo 33: B-17 Landing at Mendlesham AFB after Mission to Berlin February 3, 1945
Photo 34: B-17 Landing at Mendlesham AFB after Mission to Berlin February 3, 1945
Photo 35: B-17 on Landing approach to Mendlesham AFB after Mission to Berlin February 3, 1945
Photo 36: B-17 on Landing approach to Mendlesham AFB after Mission to Berlin February 3, 1945
Photo 37: B-17 Landing at Mendlesham AFB after Mission to Berlin February 3, 1945
Photo 38: B-17 Landing at Mendlesham AFB after Mission to Berlin February 3, 1945
Photo 39: Men Walking at Mendlesham AFB after Mission to Berlin February 3, 1945
Photo 39: Men Walking at Mendlesham AFB after Mission to Berlin February 3, 1945 - Actual Color
Photo 40: B-17 on Landing approach to Mendlesham AFB after Mission to Berlin February 3, 1945
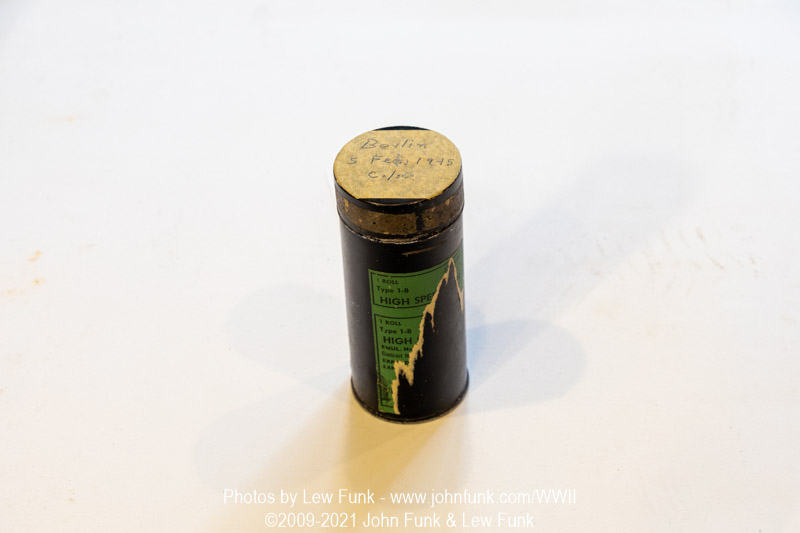
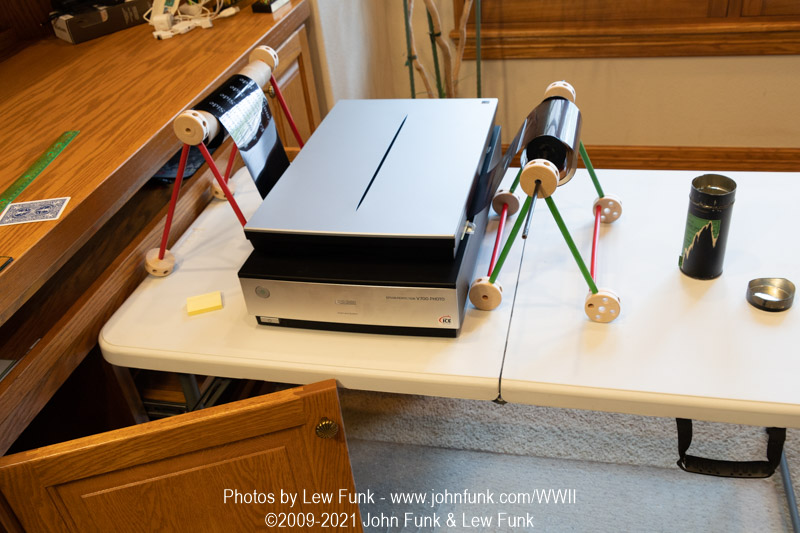
Here are some photos of the processing used to digitize this role of film. The job required a jig to hold the role of film as I moved it across the scanner. I scanned each image on the role one by one taking special care not to scratch or damage the film.
The metal canister containing the role of film.
The special jig constructed to scan this role of film.


.jpg)
.jpg)
.jpg)
.jpg)
.jpg)
.jpg)
.jpg)
.jpg)
.jpg)
.jpg)
.jpg)
.jpg)
.jpg)
.jpg)
.jpg)
.jpg)
.jpg)
.jpg)
.jpg)
.jpg)
.jpg)
.jpg)
.jpg)
.jpg)
.jpg)
.jpg)
.jpg)
.jpg)
.jpg)
.jpg)
.jpg)
.jpg)
.jpg)
.jpg)
.jpg)
.jpg)
.jpg)
.jpg)
.jpg)
.jpg)
.jpg)
.jpg)
.jpg)
.jpg)
.jpg)
.jpg)
.jpg)
.jpg)
.jpg)
.jpg)
.jpg)
.jpg)
.jpg)
.jpg)
.jpg)
.jpg)
.jpg)